KiCad is an EDA program, similar to Eagle, Altium and the like. I last tried it some years ago and found it to be very difficult to use, not least because of the inevitable steep learning curve that all CAD type programs seem to have. However, recently, I thought I’d give it another go. I downloaded and installed version 4.0.5 in order to have another bash. I was pleasantly surprised to find a much more mature product than I had found in the past and it had become usable for me.
I followed a set of introductory tutorials on YouTube called Getting To Blinky 4.0 Presented by Chris Gammel. These are well worth doing as is joining the KiCad forum Chris mentions in the videos.
As an excercise, I re-created the minDUINO v1.6 design to see if I could get to grips with the new way of working. Unlike other EDA programs, KiCad separates the component symbols on the schematic from footprints. Once a schematic has been drawn, annotated and a netlist produced a program is called specifically to associate symbols with footprints manually. Then, in the PCB layout program, they appear ready to be placed upon reading the netlist. I understand that you can have CvPCB, the association program, take a stab at allocating footprints automatically, but I haven’t got that far. I quite enjoyed this systematic approach but it can be a little frustrating when updating a design. I found that I had to re-create the netlist again after footprint association in the schematic and then import the netlist to the PCB layout program.
The outcome of my first foray into KiCad is this:
minDUINO v1.6 (KiCad)
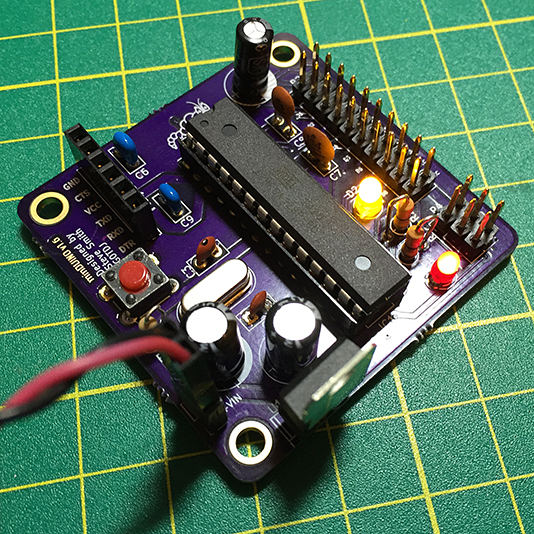
Here illustrated flashing the LED on pin 10 of the ATMEGA328 by way of a test. The board was fabricated by OSH Park in this instance. It has a couple of wrinkles though; I thought to fit a ZIF socket like the previous Eagle version of the board but I neglected to make the holes large enough to accommodate the wider pins of the socket. The ceramic capacitor hole distances are a little tight and there is a labeling issue on the underside. I also didn’t give enough clearance for the full shrouded 6-pin header for ICSP. However, these small problems aside, it worked first time.

OSH Park Fabricated minDUINO v1.6 Board Front and Back
Once I rework the design and have had some new test boards fabricated, I’ll publish all the design files on the minDUINO page.
I’ve decided to go full ‘Open Source’ after having watched several videos and read articles. I realised that I haven’t been following the full guidelines of the Open Source movement. Mostly because of my Non Commercial attitude. Over time, I will correct this site-wide and make sure all the designs are full Open Source and that all the design files reflect this. I may keep the (corrected) Eagle Files online but new designs will be produced in KiCad.